Mt. Maculot Hiking Guide 2026 — Trail Tips + Where to Stay in Lipa
Mt. Maculot is one of those hikes that keeps showing up on every “best day hikes near Manila” list — and for good reason. It’s close, it’s beautiful, and it gives you options whether you’re a beginner or a seasoned trail junkie.
Before heading to the trail, you may also want to check our how to get to Lipa City from Manila 2026 guide so you can plan your transport and travel time properly.
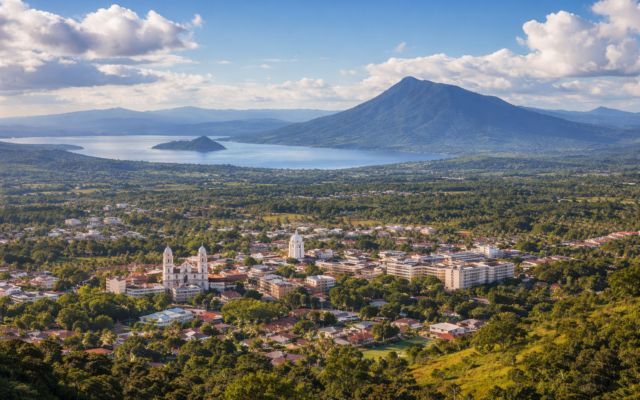
But here’s what most guides don’t tell you: where you stay the night before your hike matters just as much as the hike itself. Starting fresh from nearby Lipa City instead of dragging yourself out of Manila at 3 AM? That’s the move.
Here’s everything you need to know to plan your Mt. Maculot hike in 2026.
Quick Stats
| Detail | Info |
|---|---|
| Elevation | 930 meters above sea level |
| Difficulty | 3–4 out of 9 (beginner to moderate) |
| Trail time | 5–7 hours (round trip, depending on route) |
| Location | Barangay Pinagkaisahan, Cuenca, Batangas |
| Nearest city | Lipa City (~15 minutes away) |
| Jump-off | Cuenca Municipal Hall / Maculot registration area |
| Guide required? | Yes — mandatory |
| Best months | November to May (dry season) |
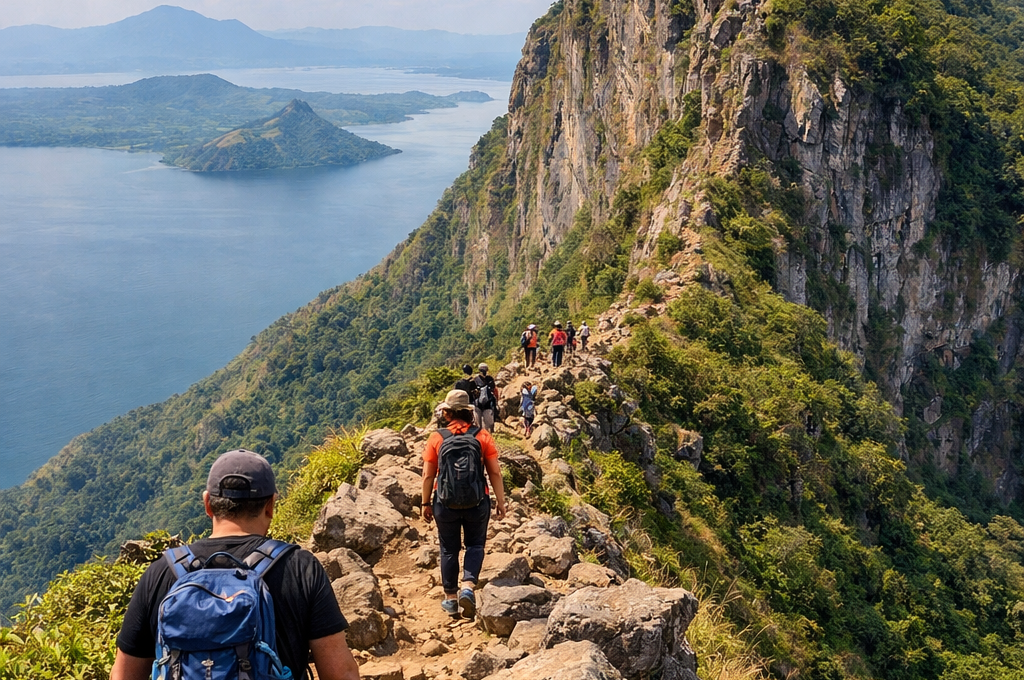
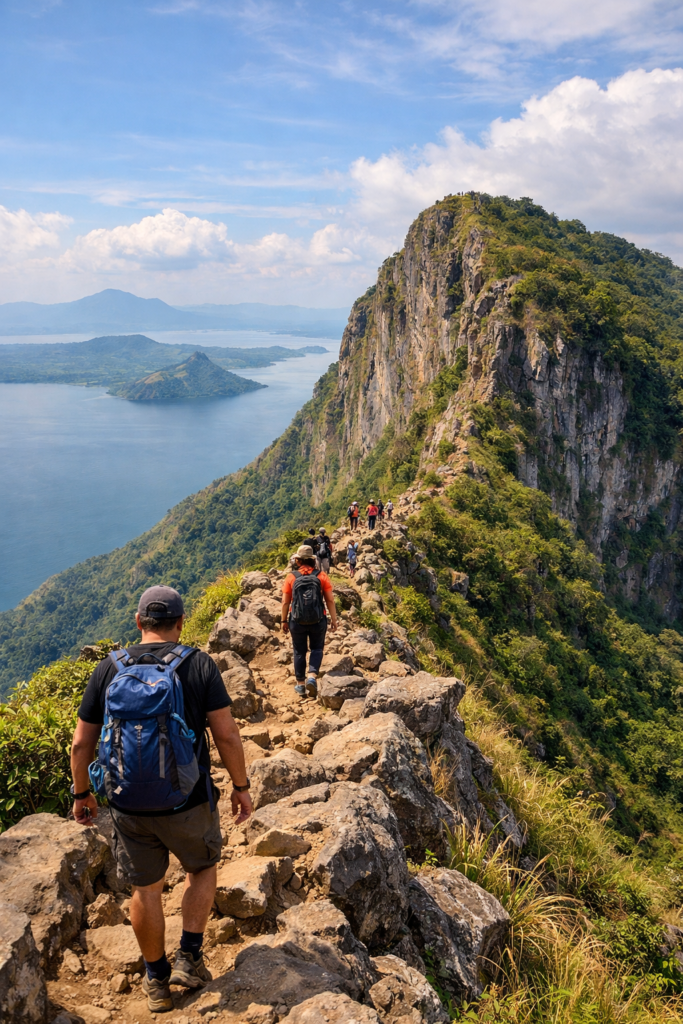
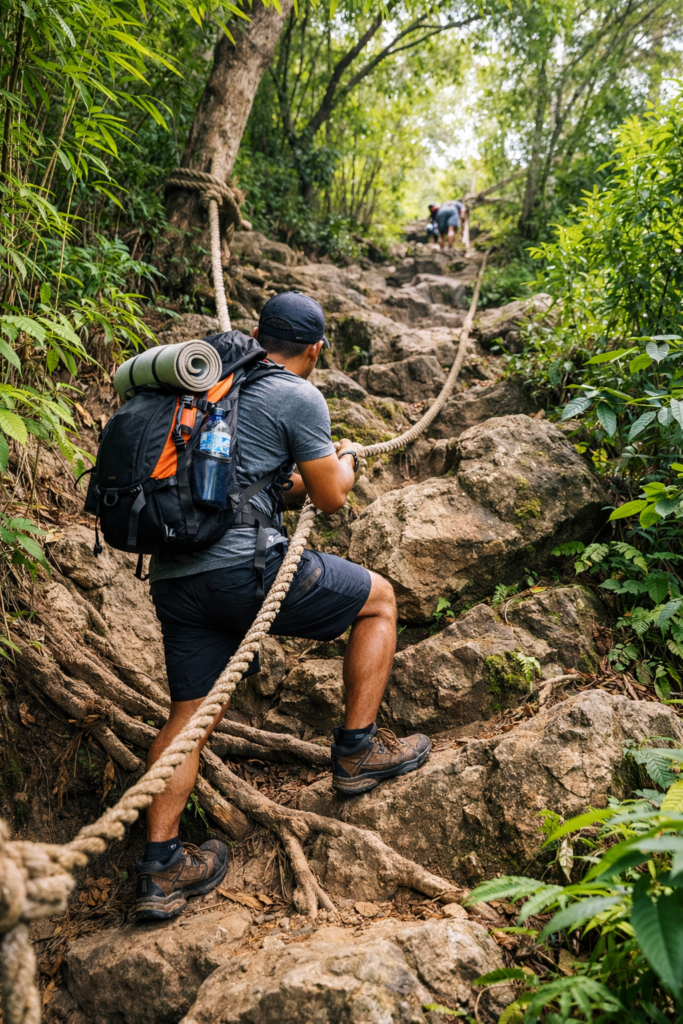
Mt. Maculot is classified as a beginner-friendly mountain, but don’t let that fool you. Some sections — especially the Rockies traverse and the summit push — have steep, exposed rock faces and rope sections that demand respect.
Three Routes to Choose From
Mt. Maculot isn’t a one-size-fits-all hike. There are three main route options, and which one you pick depends on your fitness level and how much time you have.
Route 1: Rockies Trail (Easiest)
- Elevation reached: ~706 meters (Rockies viewpoint)
- Time: 2–3 hours up, 1.5–2 hours down
- Difficulty: 2/9
- Best for: Beginners, families, people who want great views without a full-day commitment
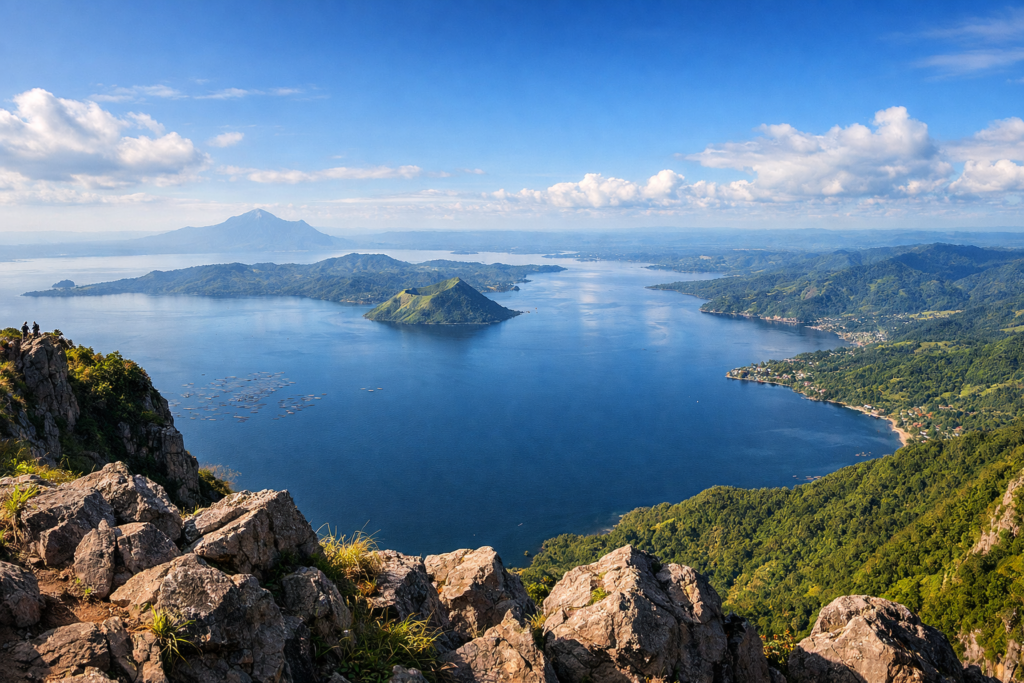
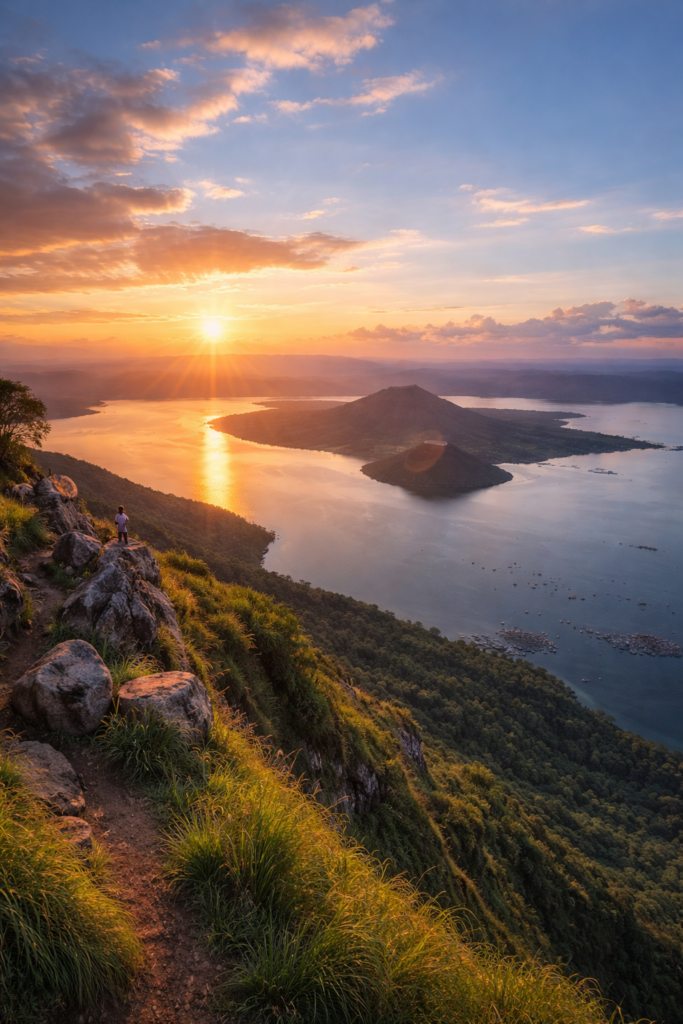
The Rockies is a rocky ridge with a panoramic view of Taal Lake, Taal Volcano, and the surrounding Batangas highlands. It’s the most Instagram-worthy spot on Maculot and you don’t need to summit to reach it.
The trail is mostly a gradual incline through a forested path, with the last section opening up to exposed rock. There are some scrambling sections near the top, but nothing technical.
Verdict: If you only have a half day or you’re new to hiking, do this one. The view alone is worth it.
Route 2: Summit Trail (Moderate)
- Elevation reached: 930 meters (true summit)
- Time: 3–4 hours up, 2–3 hours down
- Difficulty: 4/9
- Best for: Intermediate hikers who want to bag the peak
The summit trail takes you to the actual highest point of Mt. Maculot. The trail is steeper, longer, and includes sections with rope assists on rocky terrain. The summit itself is forested, so the views aren’t as dramatic as the Rockies — but there’s something satisfying about standing on the actual top.
Verdict: Do this if you’re a regular hiker and want the full mountain experience.
Route 3: Full Traverse — Rockies → Summit → Grotto (The Works)
- Elevation reached: 930 meters (summit) + Rockies viewpoint + Grotto descent
- Time: 5–7 hours total
- Difficulty: 4/9
- Best for: Experienced hikers who want the complete Maculot experience
This is the grand tour. You hit the Rockies viewpoint, continue to the summit, and descend via the Grotto trail (which passes a small cave shrine). It’s a full day, and by the end your legs will know they did something.
The traverse can be done in either direction, but Rockies-first is more common because you get the best views while you’re still fresh.
Verdict: The definitive Mt. Maculot experience. If you’ve got the stamina and an early start, this is the one.
Step-by-Step Itinerary (Full Traverse)
Here’s how a full Maculot day looks when you’re based in Lipa City:
The Night Before
7:00 PM — Arrive in Lipa City. Check into your accommodation, grab dinner, and get to bed early. You want a solid night’s sleep before a hike day.
9:00 PM — Prep your bag. Pack everything the night before. Set your alarm. Charge your phone.
Hike Day
4:30 AM — Wake up. Yeah, it’s early. That’s hiking life.
5:00 AM — Quick breakfast. Eat something substantial but not heavy. Bread, bananas, and coffee will do.
5:15 AM — Head to Cuenca. The jump-off point is only about 15 minutes from Lipa City by car or tricycle.
5:30 AM — Registration. Sign in at the registration area, pay your fees, and meet your assigned guide. This usually takes 15-20 minutes.
5:50 AM — Start the hike. Begin with the Rockies trail. The morning air is cool and the trail is shaded for the first section.
7:30 AM — Reach the Rockies viewpoint. This is where you’ll spend 20-30 minutes taking in the view, snapping photos, and catching your breath. The morning light on Taal Lake is genuinely stunning.
8:00 AM — Continue to the summit. From the Rockies, the trail connects to the summit route. This section is where it gets steeper.
10:00 AM — Summit. You’re at 930 meters. Rest, eat your trail snacks, hydrate. Enjoy the moment.
10:30 AM — Begin descent via Grotto trail. The Grotto route is a different trail down, passing through a cave area with a small shrine. It’s less steep than the way up but can be slippery.
12:30 PM — Back at the base. You did it. Legs are jelly but you feel great.
1:00 PM — Lunch in Cuenca or head back to Lipa. There are small eateries near the jump-off, or head back to Lipa for a proper meal. You’ve earned it.
2:00 PM — Shower and rest in Lipa. This is why staying in Lipa is clutch — you’ve got a comfortable place to clean up and recover before heading back to Manila.
4:00 PM — Head home to Manila (or stay another night if you’re smart about it).
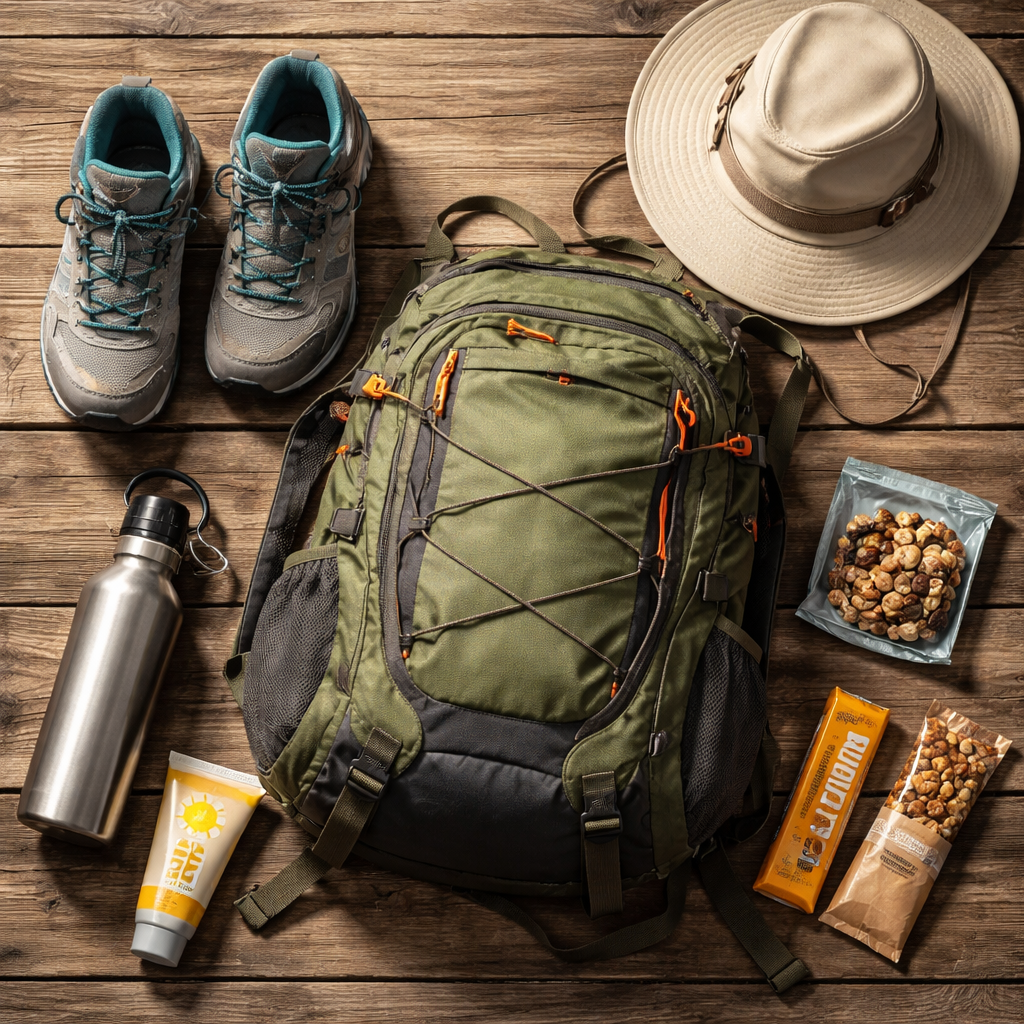
What to Bring — Hiker’s Checklist
Don’t overcomplicate it, but don’t under-pack either. Here’s what you actually need:
Essentials:
- [ ] At least 2 liters of water (there’s no water source on the trail)
- [ ] Trail food — energy bars, bananas, nuts, sandwiches
- [ ] Proper hiking shoes or trail runners (no slippers, no exceptions)
- [ ] Sunscreen (SPF 50+, the Rockies section is fully exposed)
- [ ] Hat or cap
- [ ] Rain jacket or poncho (weather changes fast in the mountains)
Highly Recommended:
- [ ] Extra dry shirt (you will sweat through your first one)
- [ ] Buff or face mask (the trail can be dusty, especially in dry season)
- [ ] Gloves for the rope sections
- [ ] Trekking pole (helpful on the descent)
- [ ] Small first aid kit (band-aids, pain reliever, blister pads)
- [ ] Power bank for your phone
Nice to Have:
- [ ] Action camera or decent phone camera
- [ ] Insect repellent
- [ ] Trash bag (pack out what you pack in — leave no trace)
Leave Behind:
- Jeans (heavy when wet, terrible for hiking)
- Bluetooth speakers (please, the mountain doesn’t want your playlist)
- Too much stuff — a 20-30L daypack is all you need
If you’re planning to explore more around Batangas after hiking, you can also visit our Taal Volcano day trip guide for another popular adventure near Lipa.
How to Get to the Jump-Off from Lipa City
The Mt. Maculot jump-off point in Cuenca is ridiculously close to Lipa City. Here’s how to get there:
By Car: Approximately 15 minutes via the Lipa-Cuenca road. Just plug “Mt. Maculot Jump-off” into Google Maps or Waze. There’s a parking area near the registration point.
By Tricycle: You can hire a tricycle from Lipa City to the Cuenca jump-off for around ₱150-₱250 (negotiate before you ride). Ask them to take you directly to the Maculot registration area.
By Motorcycle (Angkas/Local): If you’re solo, a motorcycle ride from Lipa to Cuenca is the quickest option. Around ₱100-₱150.
Budget Breakdown 2026
Here’s what your Mt. Maculot hike will cost per person:
| Expense | Cost |
|---|---|
| Registration fee | ₱100 |
| Mandatory guide fee (split among group) | ₱500–₱800 total |
| Tricycle to jump-off (from Lipa) | ₱150–₱250 |
| Tricycle back to Lipa | ₱150–₱250 |
| Water and trail food | ₱150–₱300 |
| Post-hike meal | ₱200–₱400 |
| TOTAL per person (group of 3-4) | ₱600–₱1,000 |
If you’re staying in Lipa the night before, add ₱400-₱700 per person for accommodation (depending on group size and which HavenInLipa property you book).
That’s a full mountain experience for under ₱2,000 per person including accommodation. Try getting that deal anywhere else near Manila.
Where to Stay Near Mt. Maculot

You could stay in Cuenca, but your options there are limited. The smarter play is to base yourself in Lipa City — it’s only 15 minutes from the jump-off and has way better food, accommodation, and amenities.
For a convenient place to stay before or after your hike, you can book our Cozy 1BR rental in Lipa with fast WiFi—perfect for couples or solo travelers doing outdoor trips.
The our Cozy 1BR rental in Lipa with fast WiFi—perfect for couples or solo travelers doing outdoor trips.— Ideal for a small hiking group. With 400 Mbps WiFi, you can upload your summit photos the same night. Solar-powered, so you’re keeping it green after a nature trip. Netflix for your post-hike recovery session.
The Spacious 2BR Lipa rental for groups — If your hiking crew is bigger, this is the one. Split ₱2,800 among 6-9 people and you’re paying ₱311-₱467 each for a comfortable night’s sleep before the trail. Free parking if you’re driving down from Manila.
Why HavenInLipa works as a base camp:
- 15 minutes from the Mt. Maculot jump-off
- Near restaurants and convenience stores for pre-hike supply runs
- Hot showers waiting for you after the hike (and you will need that shower)
- Your host Melody can help arrange tricycle transport to the jump-off
Book at HavenInLipa.com
Important Safety Reminders
This section isn’t optional reading. Mt. Maculot is beginner-friendly, but mountains deserve respect.
- A guide is mandatory. This is enforced at registration. Don’t try to skip it. Your guide knows the trail, the weather patterns, and what to do if something goes wrong.
- Rope sections exist. Both the Rockies scramble and parts of the summit trail have sections where you’ll need to grab ropes anchored into the rock. Wear gloves and test your footing before committing your weight.
- The trail can be slippery. Especially during or right after rain. Loose soil and wet rocks are the most common causes of injury on Maculot. Go slow on descents.
- Start early. The mountain gets hot and exposed by midday. Starting at sunrise means you’re at the Rockies before the heat kicks in.
- Watch the weather. If it’s raining hard or there are thunderstorm warnings, postpone your hike. An exposed ridge during a lightning storm is not where you want to be.
- Tell someone your plan. Let your host or a friend know what route you’re taking and when you expect to be back.
If you’re planning your stay in Lipa, here’s why booking direct instead of Airbnb saves you more and how you can get better rates.
Frequently Asked Questions
Is Mt. Maculot good for beginners?
Yes, especially the Rockies trail. It’s one of the most popular beginner hikes in the Philippines. Just make sure you’re in reasonable physical shape and wear proper shoes. If you can walk uphill for 2-3 hours, you can do the Rockies.
How long does it take to hike Mt. Maculot?
The Rockies trail takes about 3-5 hours round trip. The full traverse (Rockies + Summit + Grotto) takes 5-7 hours. Your pace and rest stops will determine your exact time.
Do I need to register in advance?
Walk-in registration is generally available, but it’s a good idea to arrive early (before 6 AM) especially on weekends. Some local mountaineering groups can help arrange advance registration during peak season.
Can I camp on Mt. Maculot?
Camping is generally not allowed on Maculot as of 2026. It’s best done as a day hike. Check with the local tourism office for the latest policies.
What’s the closest accommodation to Mt. Maculot?
Lipa City is the nearest city with quality accommodation options. HavenInLipa is just 15 minutes from the jump-off point and starts at ₱2,000/night. It’s the most convenient base camp option.
Ready to plan your Lipa trip?
💸 Booking direct saves you 15-20% — here’s why
👨👩👧 Traveling with family or a group? See the Spacious 2BR
👫 Trip for two or solo? See the Cozy 1BR